 Some folks just want a slip-on type paracord bracelet, without a side-release buckle, knot and loop, button, or bead type closure. This is just another way of tying them instead of following more traditional tying methods, like some found online, here and here.
I prefer a finished slip-on bracelet to be a tight fit over my hand so that it's not too big on the wrist. You may untie/retie yours a time or two to get the fit just right.
The photo collage should be easy enough to follow. Click on it to view a larger version.
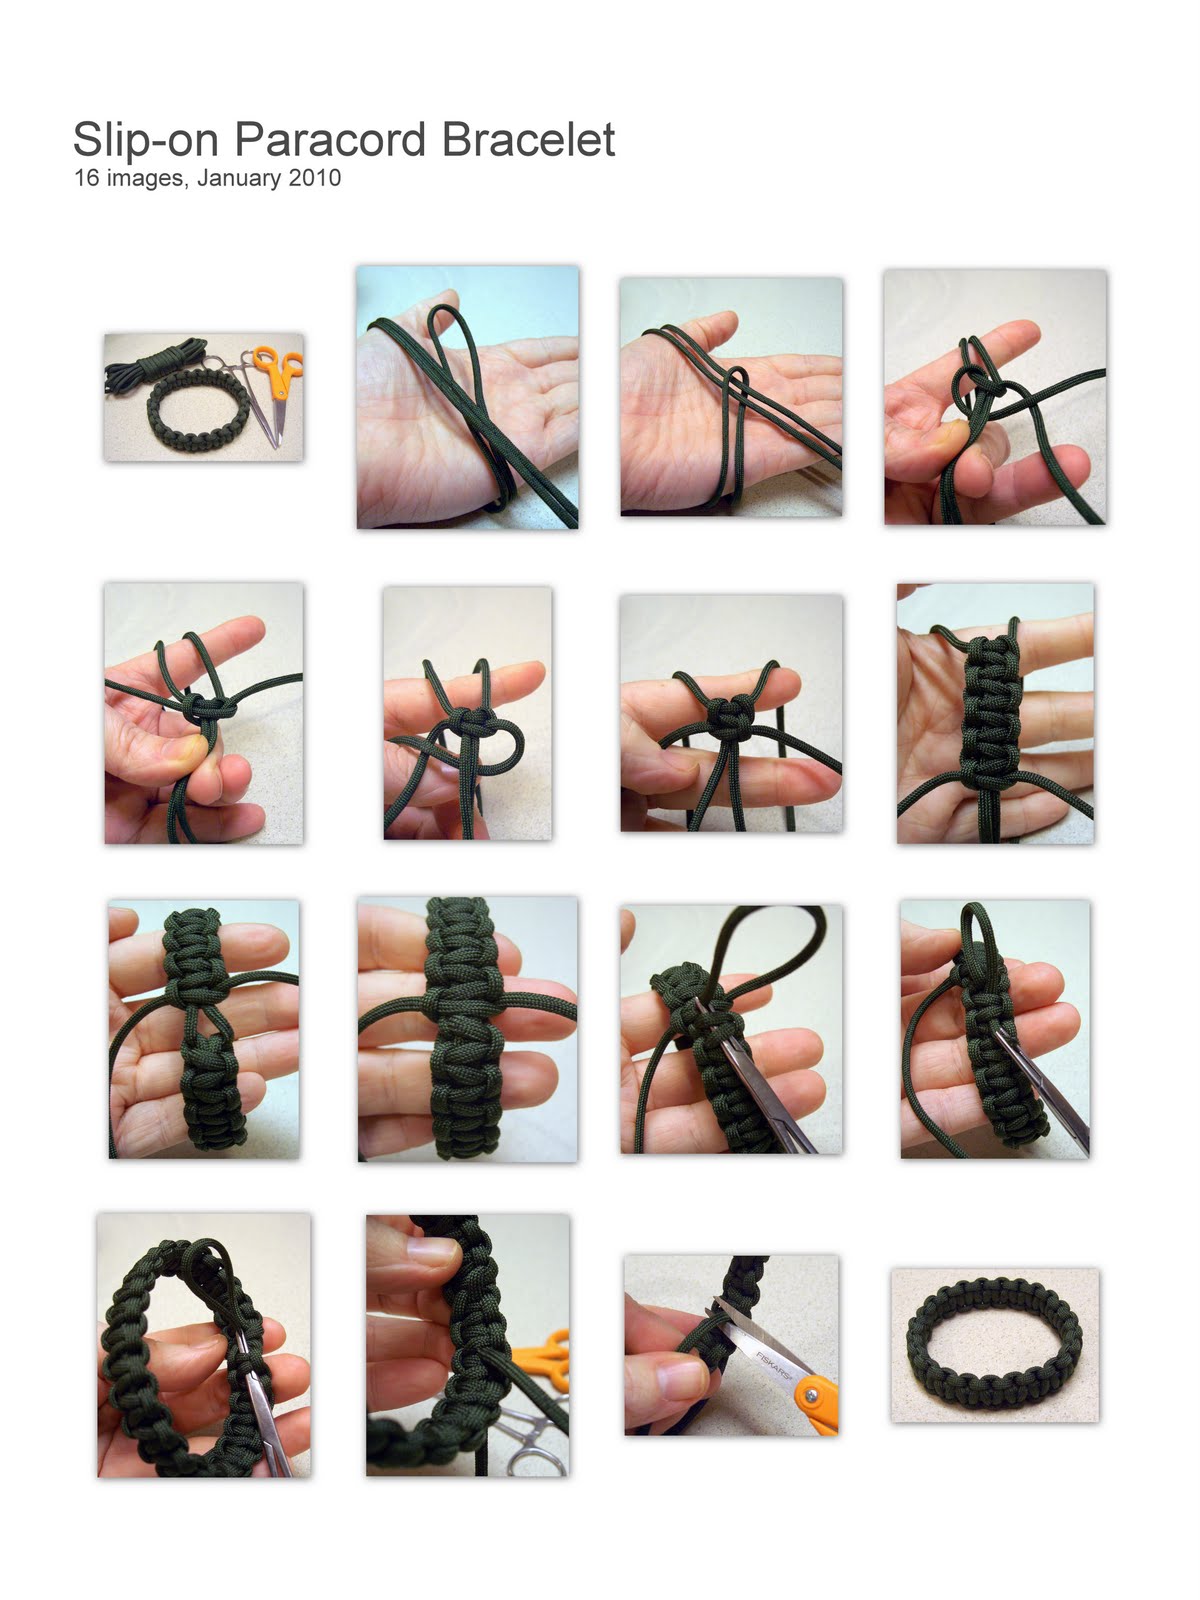
Supplies I used, are 10.5 feet of paracord, hemostats, and scissors.
To start, find the center of the length of paracord and wrap it around the widest part of your hand. Run the working ends through the loop, making a 'lark's head', also called a 'cow hitch', or 'ring hitch'. Make sure to hold the cords at the fixed size around your hand, as you slide the paracord loop off your hand.
You'll start knotting around the two loop strands as the core. Continue knotting all the way around the core loop until you've filled the space back to where you started.
Use hemostats or thin needle nosed pliers to pull the remaining paracord ends under at least a couple of knots, one strand under the outer side and the other on the inner side of the bracelet. You can trim the excess off to finish, after working the cord under a couple of knots, or work it under more knots if you want to keep the extra remaining excess paracord strands. This can make the bracelet slightly thicker, so consider leaving a little more room when you first loop around your hand at the start.
 The section where the start and finish meet may look slightly different depending on which side of the bracelet you have facing out.
You can of course use two colors of paracord by sewing, melting, or super gluing two strands together, with the connected section being in the loop part wrapped around your hand and knotted over. This will give you a 'reversible' paracord bracelet with different edge and center colors on each side.

You can also wrap the cord around your hand 2, 3, or more times at the start for a thicker core of 4, 6, or more strands to be knotted over, but this will also make for a thicker rounded bracelet and require a few extra feet of paracord for your starting length.
Other paracord bracelet variations(or hatbands) like the woven and half hitch types can also be tied this way. If you use double the amount of cord to start, you can do a king cobra/doubled Solomon bar/Portuguese sinnet version, after tying all the way around once and going over all the knots again. But, remember that the added thickness will require a little more slack around the wide part of your hand at the start, so that the finished bracelet won't be too tight to fit over your hand when sliding on the wrist.

As Charlie mentioned in the comments of the previous blog post, elastic or shock cord can be used for the core of a seamless bracelet and knotted over, to allow it to stretch over a hand and still fit snugly around the wrist. I'd tried shock cord like that a few years ago, for an adjustable fit slide on/off watchband, but couldn't get it to where it felt comfortable to me, but it may work fine for others.
*Added a video slide show tutorial for this project on YouTube.
24 comments:
finally, ive wanted to make a bracelet for a while but always forget to buy clips... Great Work yet again, as a rope work enthusiast its great o see your projects
Hey! great that you have given the step by step picture guide as well. Should be help to the enthusiasts!
Dropped by to wish you happy new year.
Cheers & good health,
Velu
Don't forget paracord shrinks a little when wet though so allow.
I just use a bungee cord center.
thanks a lot for showing your work..
I can't see how to start the knots at the lark's-head; might be better to use a lighter-colored rope, or maybe the two-color variant to illustrate the knots better.
Any advice on how to get it going?
Once you have the loop sized to your hand, you take the two working ends of the cord and start knotting around the two core/loop strands with the cobra stitch/Solomon bar/Portuguese sinnet/square knotting.
Here's another link that demonstrates how to tie the knots.
Thanx so much for this. I'm trying to make one of the "seamless" ones with shock cord as the core. I just had two questions:
1. Do you leave the two ends loose and join them at the other end of the bracelet?
2. How do you join the shock cord? I tried tying it (it doesn't melt too easily), but it made an unsightly bulge. Thanx!
I work the ends back into/under the starting knots when I've come all the way back around, and that works fine to secure them.
Tying a couple of knots(like a fisherman's bend)with the shock cord is probably the easiest method to secure them, but there is that knot you mentioned, that will cause a bulge.
You can try overlapping the shock cord ends for about 1/2 to 1 inch, and then running a needle and thread back and forth through them many times to secure it, or a bit of super glue might work too...
Wow your work is great! I've recently started making lanyards like these. There is one product I've been trying to figure out, but as much as I try, I just can not figure it out. It is a small hand sanitizer bottle wrapped with a knot similar to this one as seen in a survival strap website. Can you offer any help?
I've had a couple of folks ask me about the wrapped bottle, but I haven't tied one, so I don't know the specific method they used with only one side of the bottle being shown.
You could ask the makers, and they may even offer some pointers on it.
That's a good point about asking the makers Stormdrane, however, I think I figured it out...I'm just going to need some sharp needle point pliers or hemostats. I'll keep you updated.
[IMG]http://i49.tinypic.com/25jdx7q.jpg[/IMG]
The beginning and ending of both stitches.
[IMG]http://i48.tinypic.com/2nq5stc.jpg[/IMG]
Middle of the bracelet
[IMG]http://i48.tinypic.com/5cndsp.jpg[/IMG]
Whole bracelet completed
Just finished this up. Used 13 feet of White and Red melted together (6.5 feet of each), and then finished it up with 12 feet of blue paracord in a King Cobra Stitch to create the red,white and blue bracelet. Looking back on it I should have melted the blue and white together to get it in the normal order of red white and blue. I always come on this website and see what new and interesting things you have come up with. Love your site, keep up the good work. Semper Fi, Juan
Awesome page storm...cause of you I've been keeping myself busy in down time and I got friends now asking me to make stuff. Learning so much from your page!!!!!!!! Keep up the great work.
"How do you join the shock cord? I tried tying it (it doesn't melt too easily), but it made an unsightly bulge. Thanx!"
Joe,
Not sure if you ever figured this out, but one thing you can try to attach the shock cord ends is to use rope clamps like you'd see on a neck lanyard.
You can find some on Creative Design Works website.
Here's the link, and for the record I am in no way affiliated to them at all.
http://cdwplus.com/singleHORSE.html#anchor200329
Great tutorials! I really, really need your help though. I thought I had come across a link in one of your projects on how to do a 4 or 6 core cobra weave bracelet without using buckles. I even made one once, but can not for the life of me figure out how I did it. I searched through all of the post on your blog and even looked at all of your photos in Photobucket and haven't come across it again. Any suggestions? Thanks!
@Doc Harvey, for making the slip-on type paracord bracelet with a 4 or 6 strand core, just start off the same way as the 2 strand core. Once you have the cord around your hand for sizing, just wrap the cord around it once or twice more, then knot over all the core strands. Hope that makes sense. ;)
Great tutorial, got it right off the bat my first try.
Though even as tight as I initially start it and as tight as I make the knots it is still HUGE on my wrist when completed.
I guess I have a large wrist to hand ratio.
:P
Is there anyway to tie this type of slip-on bracelet using a snake braid?
@Anonymous, with using the snake knot, just start off just like the example in the blog post, looping the cord around the hand, then start tying the snake knot around the loop as the core strands... ;)
Stormdrane, I found your blog through comments on some youtube videos and hope you can help me out. I read through your instructables ( http://www.instructables.com/id/Paracord-bracelet-with-a-side-release-buckle/ ) and that is the type of bracelet I've been making...but I' really need to make a different type of one for my kids right now. I found this image which is closest to what I'm shooting for.
http://img1.etsystatic.com/016/0/7804194/il_570xN.425083759_rxz1.jpg
Is is just a variation on the solomon/thin line? I didn't really want the center stripe to show all the way along the bracelet though. Any advice?
@Jen, The linked bracelet is a regular Solomon bar/thin line type, with the center strand added in, worked over/under the horizontal cords of the bracelet pattern, and through the charm/pendant in the center.
If just wanting to add the charm/pendant, you can run that extra strand along the core strands, then out and through the attachment points of your charm/pendant, and back into the core strands, where it'll be out of sight.
You can try using the existing core strands to work in a charm/pendant, without adding an extra strand, but that may or may not work depending on the parts/and project...
Excellent, as always. Have you tried using the "Lance Armstrong" style rubber band bracelets as the core? They seem to be working pretty well for me, and the nieces and nephews love 'em.
hw
@hw, I've not used the silicone bracelets as a core, but know some folks have.
A few years ago, a friend had suggested tying over silicone USB bracelets , and it was added to the 'one of these days' projects list... ;)
I did that around a hair bungee and it stretches just fine!
Post a Comment